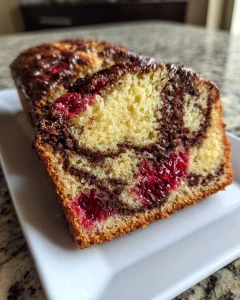
Cherry Garcia Loaf Cake — A Bakery-Style Treat You Can Make at Home
As a busy mom, I know how precious time can be, especially when it comes to baking. That’s why I’m excited to share my Cherry Garcia Loaf Cake — a bakery-style treat you can make at home! This delightful cake combines the sweet, tart flavor of cherries with rich chocolate, creating a dessert that’s sure to impress your loved ones. Whether you’re looking for a quick solution for a busy day or a special treat for a gathering, this loaf cake is the perfect answer. Trust me, it’s as easy as pie, or should I say, cake!
Why You’ll Love This Cherry Garcia Loaf Cake
This Cherry Garcia Loaf Cake is a game-changer for busy days. It’s quick to whip up, taking just 15 minutes of prep time. The combination of cherries and chocolate creates a flavor explosion that’s simply irresistible. Plus, it’s a versatile dessert that can be enjoyed for breakfast, as a snack, or after dinner. You’ll love how it fills your home with a warm, inviting aroma while making your loved ones smile!
Ingredients for Cherry Garcia Loaf Cake
Gathering the right ingredients is the first step to creating your Cherry Garcia Loaf Cake. Here’s what you’ll need:
- All-purpose flour: This is the backbone of your cake, providing structure and texture.
- Granulated sugar: Sweetens the cake and helps create that lovely, moist crumb.
- Unsalted butter: Adds richness and flavor; make sure it’s softened for easy mixing.
- Large eggs: They bind the ingredients together and contribute to the cake’s fluffiness.
- Buttermilk: This secret ingredient adds moisture and a slight tang, enhancing the flavor.
- Vanilla extract: A must-have for that warm, comforting aroma and taste.
- Baking powder: This leavening agent helps the cake rise, making it light and airy.
- Baking soda: Works alongside baking powder for a perfect rise and texture.
- Salt: Just a pinch enhances all the flavors in your cake.
- Fresh or frozen cherries: The star of the show! They add bursts of juicy flavor throughout the cake.
- Chocolate chips: These little morsels bring a delightful richness that pairs perfectly with cherries.
For those who want to get creative, consider using almond extract instead of vanilla for a unique twist. You can also swap in whole wheat flour for a healthier option, or use dairy-free butter and milk for a vegan version. The exact quantities for each ingredient are listed at the bottom of the article, ready for you to print and take to the kitchen!
How to Make Cherry Garcia Loaf Cake
Now that you have your ingredients ready, let’s dive into the fun part: making your Cherry Garcia Loaf Cake! Follow these simple steps, and you’ll have a bakery-style treat that will wow your family and friends.
Step 1: Preheat and Prepare
First things first, preheat your oven to 350°F (175°C). This is crucial for baking success. While the oven warms up, grease your loaf pan with a bit of butter or cooking spray. This will ensure your cake slides out easily once it’s baked.
Step 2: Cream Butter and Sugar
In a large mixing bowl, cream together the softened butter and granulated sugar until the mixture is light and fluffy. This step is vital for a moist cake, as it incorporates air into the batter. You’ll know it’s ready when it looks pale and has a smooth texture.
Step 3: Add Eggs
Next, add the eggs one at a time, mixing well after each addition. This helps to incorporate air, giving your cake a lighter texture. Don’t rush this step; take your time to ensure everything is well combined.
Step 4: Mix in Buttermilk and Vanilla
Now, stir in the buttermilk and vanilla extract. This adds moisture and a lovely flavor to your cake. The buttermilk also helps to tenderize the crumb, making each slice melt in your mouth.
Step 5: Combine Dry Ingredients
In another bowl, whisk together the all-purpose flour, baking powder, baking soda, and salt. This ensures that the leavening agents are evenly distributed throughout the flour, which is key for a well-risen cake.
Step 6: Combine Wet and Dry Ingredients
Gradually add the dry ingredients to the wet mixture, mixing until just combined. Be careful not to overmix; this can lead to a dense cake. You want a tender crumb, so mix gently until you see no dry flour.
Step 7: Fold in Cherries and Chocolate Chips
Now comes the fun part! Fold in the chopped cherries and chocolate chips. This step adds delightful bursts of flavor throughout your cake. Make sure they’re evenly distributed for a perfect bite every time.
Step 8: Pour and Bake
Pour the batter into your prepared loaf pan and smooth the top with a spatula. Bake in your preheated oven for 50-60 minutes. To check for doneness, insert a toothpick into the center; it should come out clean or with a few moist crumbs.
Step 9: Cool and Serve
Once baked, allow the cake to cool in the pan for about 10 minutes. This helps maintain its structure. After that, transfer it to a wire rack to cool completely. Your Cherry Garcia Loaf Cake is now ready to be sliced and enjoyed!
Tips for Success
- Use room temperature ingredients for better mixing.
- Don’t skip the creaming step; it’s key for a fluffy texture.
- Measure flour correctly by spooning it into the cup and leveling it off.
- Check your cake a few minutes before the timer goes off to avoid overbaking.
- Let the cake cool completely before slicing for cleaner cuts.
Equipment Needed
- Loaf pan: A standard 9×5 inch pan works best, but any similar size will do.
- Mixing bowls: Use one large bowl for wet ingredients and another for dry.
- Electric mixer: A hand mixer is great, but a whisk will work too.
- Spatula: For folding in cherries and chocolate chips.
- Wire rack: Essential for cooling your cake evenly.
Variations
- Nutty Delight: Add 1/2 cup of chopped walnuts or pecans for a crunchy texture and nutty flavor.
- Berry Blast: Swap out cherries for blueberries or raspberries for a different fruity twist.
- Chocolate Lovers: Use dark chocolate chips instead of semi-sweet for a richer chocolate experience.
- Gluten-Free Option: Substitute all-purpose flour with a gluten-free blend for a delicious gluten-free treat.
- Vegan Version: Replace eggs with flax eggs and use plant-based butter and non-dairy milk for a vegan-friendly cake.
Serving Suggestions
- Serve warm with a dollop of whipped cream for a decadent touch.
- Pair with a scoop of vanilla ice cream for a delightful contrast.
- Drizzle with chocolate sauce for an extra indulgent treat.
- Garnish with fresh cherries or mint leaves for a pop of color.
- Enjoy with a cup of coffee or tea for a cozy afternoon snack.
FAQs about Cherry Garcia Loaf Cake
As you embark on your baking adventure with this Cherry Garcia Loaf Cake, you might have a few questions. Here are some common queries I’ve encountered, along with helpful answers to guide you along the way.
Can I use frozen cherries instead of fresh?
Absolutely! Frozen cherries work just as well in this recipe. Just make sure to thaw and drain them before adding to the batter to avoid excess moisture.
How should I store the Cherry Garcia Loaf Cake?
Store your cake in an airtight container at room temperature for up to three days. If you want to keep it longer, consider freezing it. Just wrap it tightly in plastic wrap and foil.
Can I make this cake ahead of time?
Yes! This cake actually tastes even better the next day as the flavors meld together. Just bake it a day in advance and store it properly.
What can I substitute for buttermilk?
If you don’t have buttermilk on hand, you can easily make a substitute. Just mix one cup of milk with one tablespoon of vinegar or lemon juice. Let it sit for about 5 minutes, and you’re good to go!
Can I add nuts to the Cherry Garcia Loaf Cake?
Definitely! Chopped walnuts or pecans can add a delightful crunch and flavor. Just fold them in along with the cherries and chocolate chips for a tasty twist.
Summarizing the Joy of Baking Cherry Garcia Loaf Cake
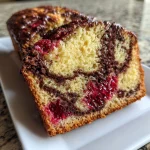
Baking the Cherry Garcia Loaf Cake is more than just a recipe; it’s an experience filled with joy and warmth. The delightful aroma wafting through your kitchen as it bakes is enough to make anyone’s heart sing. Each slice reveals a beautiful blend of cherries and chocolate, creating a moment of bliss with every bite. Whether you’re sharing it with family or savoring it alone, this cake brings a sense of accomplishment and happiness. So, roll up your sleeves, embrace the process, and let this bakery-style treat become a cherished part of your home baking adventures!
PrintCherry Garcia Loaf Cake: Bake Your Dream Dessert Today!
A delightful Cherry Garcia loaf cake that combines the flavors of cherries and chocolate in a moist, bakery-style treat.
- Prep Time: 15 minutes
- Cook Time: 60 minutes
- Total Time: 1 hour 15 minutes
- Yield: 1 loaf 1x
- Category: Dessert
- Method: Baking
- Cuisine: American
- Diet: Vegetarian
Ingredients
- 1 1/2 cups all-purpose flour
- 1 cup granulated sugar
- 1/2 cup unsalted butter, softened
- 2 large eggs
- 1/2 cup buttermilk
- 1 teaspoon vanilla extract
- 1 teaspoon baking powder
- 1/2 teaspoon baking soda
- 1/4 teaspoon salt
- 1 cup fresh or frozen cherries, pitted and chopped
- 1/2 cup chocolate chips
Instructions
- Preheat your oven to 350°F (175°C) and grease a loaf pan.
- In a large bowl, cream together the butter and sugar until light and fluffy.
- Add the eggs one at a time, mixing well after each addition.
- Stir in the buttermilk and vanilla extract.
- In another bowl, whisk together the flour, baking powder, baking soda, and salt.
- Gradually add the dry ingredients to the wet ingredients, mixing until just combined.
- Fold in the chopped cherries and chocolate chips.
- Pour the batter into the prepared loaf pan and smooth the top.
- Bake for 50-60 minutes or until a toothpick inserted into the center comes out clean.
- Allow to cool in the pan for 10 minutes before transferring to a wire rack to cool completely.
Notes
- For best results, use fresh cherries when in season.
- This cake can be stored in an airtight container for up to 3 days.
- Serve with whipped cream or vanilla ice cream for an extra treat.
Nutrition
- Serving Size: 1 slice
- Calories: 250
- Sugar: 20g
- Sodium: 150mg
- Fat: 10g
- Saturated Fat: 6g
- Unsaturated Fat: 4g
- Trans Fat: 0g
- Carbohydrates: 35g
- Fiber: 1g
- Protein: 3g
- Cholesterol: 50mg