Easy Halloween Breadstick Rattlers
As a busy mom, I know how chaotic Halloween can get. Between costume planning and school events, finding time to whip up something fun can feel impossible. That’s where these Easy Halloween Breadstick Rattlers come in! They’re not just a treat; they’re a delightful way to bring a little spooky fun to your table without spending hours in the kitchen. With just a few ingredients and minimal prep, you can impress your family and friends with these adorable snake-shaped breadsticks. Trust me, they’ll be the talk of the party!
Why You’ll Love This Easy Halloween Breadstick Rattlers
These Easy Halloween Breadstick Rattlers are a lifesaver for busy nights! They come together in just 30 minutes, making them perfect for last-minute gatherings. Plus, the kids will love helping shape the dough into slithering snakes, turning cooking into a fun family activity. With gooey cheese and savory pepperoni, they’re not just cute; they’re delicious too! You’ll find yourself making these every Halloween!
Ingredients for Easy Halloween Breadstick Rattlers
Gathering the right ingredients is half the fun! Here’s what you’ll need to create these spooky treats:
- Refrigerated breadstick dough: This is the base of your rattlers. It’s quick and easy, saving you time on a busy day.
- Mozzarella cheese: Shredded mozzarella adds a gooey, melty goodness that kids and adults alike will love.
- Pepperoni slices: These little circles of flavor bring a savory kick. You can swap them for turkey pepperoni or even omit them for a vegetarian option.
- Egg: A beaten egg is perfect for brushing on the dough, giving it a beautiful golden color when baked.
- Olive oil: A light brush of olive oil adds flavor and helps the breadsticks crisp up nicely.
- Black olives: These are used for the eyes, giving your rattlers a fun and spooky look. You can also use small pieces of other dark vegetables if you prefer.
Feel free to get creative! You can add herbs or spices to the dough for extra flavor. If you want to make these ahead of time, just prepare them and store them in the fridge until you’re ready to bake. For exact quantities, check the bottom of the article where you can find a printable version!
How to Make Easy Halloween Breadstick Rattlers
Step 1: Preheat the Oven
First things first, preheat your oven to 375°F (190°C). This step is crucial! A hot oven ensures your Easy Halloween Breadstick Rattlers bake evenly and turn golden brown. While the oven heats up, you can get everything else ready.
Step 2: Prepare the Dough
Next, unroll the refrigerated breadstick dough. Carefully separate it into individual sticks. This part is like unwrapping a present! Each stick will become a slithering snake, so don’t worry about perfection. Just make sure they’re all ready to be shaped.
Step 3: Shape the Rattlers
Now comes the fun part! Shape each breadstick into a snake-like form. Twist and curl them as you like. Think of how a snake moves—this is your chance to get creative! The more unique the shape, the more fun they’ll look on your table.
Step 4: Add Cheese and Pepperoni
Once your rattlers are shaped, it’s time to add some flavor. Place a few pieces of shredded mozzarella cheese and pepperoni slices along the length of each breadstick. This will give them a delicious surprise inside. Don’t be shy—load them up!
Step 5: Brush with Egg and Oil
Grab that beaten egg and a brush. Lightly brush the shaped breadsticks with the egg mixture and a drizzle of olive oil. This step is key for achieving that beautiful golden color. Plus, it adds a lovely flavor that will make your rattlers irresistible!
Step 6: Create Eyes
Now, let’s give your rattlers some personality! Use black olives to create eyes on each breadstick. Just slice them in half and place them on top. If you’re feeling adventurous, you can even use other veggies to make them look extra spooky!
Step 7: Bake to Perfection
Finally, it’s time to bake! Place your rattlers on a baking sheet and pop them in the preheated oven. Bake for 12-15 minutes or until they’re golden brown. The aroma will fill your kitchen, making it hard to wait. Once they’re done, let them cool slightly before serving. Enjoy the spooky fun!
Tips for Success
- Make sure your oven is fully preheated for even baking.
- Experiment with different shapes for your rattlers; the more creative, the better!
- For extra flavor, sprinkle some garlic powder or Italian herbs on top before baking.
- Keep an eye on them while baking; ovens can vary in temperature.
- Serve with marinara sauce for a delicious dipping option!
Equipment Needed
- Baking sheet: A standard baking sheet works perfectly. If you don’t have one, a large oven-safe dish will do.
- Parchment paper: This is optional but helps with easy cleanup. You can also grease the baking sheet instead.
- Pastry brush: Use this for brushing the egg and oil. A clean paintbrush can be a fun alternative!
- Knife: A sharp knife is needed for slicing olives and pepperoni.
Variations
- Cheesy Garlic Rattlers: Add minced garlic and a sprinkle of Parmesan cheese to the dough for a savory twist.
- Veggie Rattlers: Swap out pepperoni for diced bell peppers or mushrooms for a healthier option.
- Spicy Rattlers: Incorporate jalapeño slices or a sprinkle of red pepper flakes for a kick of heat.
- Sweet Rattlers: For a dessert version, use cinnamon sugar and chocolate chips instead of cheese and pepperoni.
- Gluten-Free Rattlers: Use gluten-free breadstick dough to accommodate dietary needs.
Serving Suggestions
- Pair your Easy Halloween Breadstick Rattlers with a warm marinara sauce for dipping.
- Serve alongside a fresh salad for a balanced meal.
- For drinks, consider spooky-themed beverages like a witch’s brew punch.
- Present them on a festive platter with Halloween decorations for added flair.
FAQs about Easy Halloween Breadstick Rattlers
Can I make these Easy Halloween Breadstick Rattlers ahead of time?
Absolutely! You can prepare the rattlers and store them in the fridge until you’re ready to bake. Just remember to brush them with the egg and oil right before baking for that golden finish.
What can I serve with the Easy Halloween Breadstick Rattlers?
These rattlers pair wonderfully with marinara sauce for dipping. You can also serve them alongside a fresh salad or some spooky-themed drinks to complete your Halloween spread!
Can I customize the toppings on my rattlers?
How do I store leftovers?
If you have any leftovers, store them in an airtight container in the fridge. They’re best enjoyed within a couple of days. You can reheat them in the oven for a few minutes to regain that crispy texture.
Are these Easy Halloween Breadstick Rattlers suitable for kids?
Summarizing the Fun of Easy Halloween Breadstick Rattlers
Making these Easy Halloween Breadstick Rattlers is more than just cooking; it’s about creating memories with your loved ones. The laughter shared while twisting the dough and the excitement of adding silly eyes brings everyone together. Plus, the delicious aroma wafting through your kitchen sets the perfect Halloween mood. Whether you’re hosting a party or enjoying a cozy night in, these rattlers are sure to impress. So roll up your sleeves, gather the family, and dive into this fun culinary adventure. Trust me, these spooky treats will become a cherished Halloween tradition!
PrintEasy Halloween Breadstick Rattlers: Spook Your Guests!
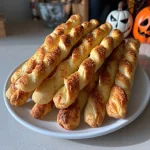
These Easy Halloween Breadstick Rattlers are a fun and spooky treat perfect for Halloween parties. Shaped like snakes, they are sure to impress your guests!
- Prep Time: 15 minutes
- Cook Time: 15 minutes
- Total Time: 30 minutes
- Yield: 12 breadsticks 1x
- Category: Appetizer
- Method: Baking
- Cuisine: American
- Diet: Vegetarian
Ingredients
- 1 can of refrigerated breadstick dough
- 1/2 cup of mozzarella cheese, shredded
- 1/4 cup of pepperoni slices
- 1 egg, beaten
- Olive oil for brushing
- Black olives for eyes
Instructions
- Preheat your oven to 375°F (190°C).
- Unroll the breadstick dough and separate it into individual sticks.
- Shape each breadstick into a snake-like form, twisting and curling as desired.
- Place a few pieces of mozzarella cheese and pepperoni slices along the length of each breadstick.
- Brush the shaped breadsticks with the beaten egg and olive oil.
- Use black olives to create eyes on each breadstick.
- Bake in the preheated oven for 12-15 minutes or until golden brown.
- Remove from the oven and let cool slightly before serving.
Notes
- Feel free to add other toppings like herbs or spices for extra flavor.
- These can be made ahead of time and reheated before serving.
- Serve with marinara sauce for dipping.
Nutrition
- Serving Size: 1 breadstick
- Calories: 150
- Sugar: 1g
- Sodium: 300mg
- Fat: 7g
- Saturated Fat: 3g
- Unsaturated Fat: 2g
- Trans Fat: 0g
- Carbohydrates: 18g
- Fiber: 1g
- Protein: 4g
- Cholesterol: 20mg