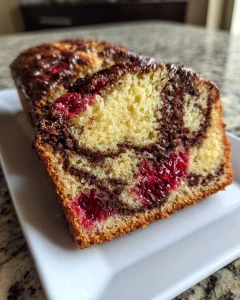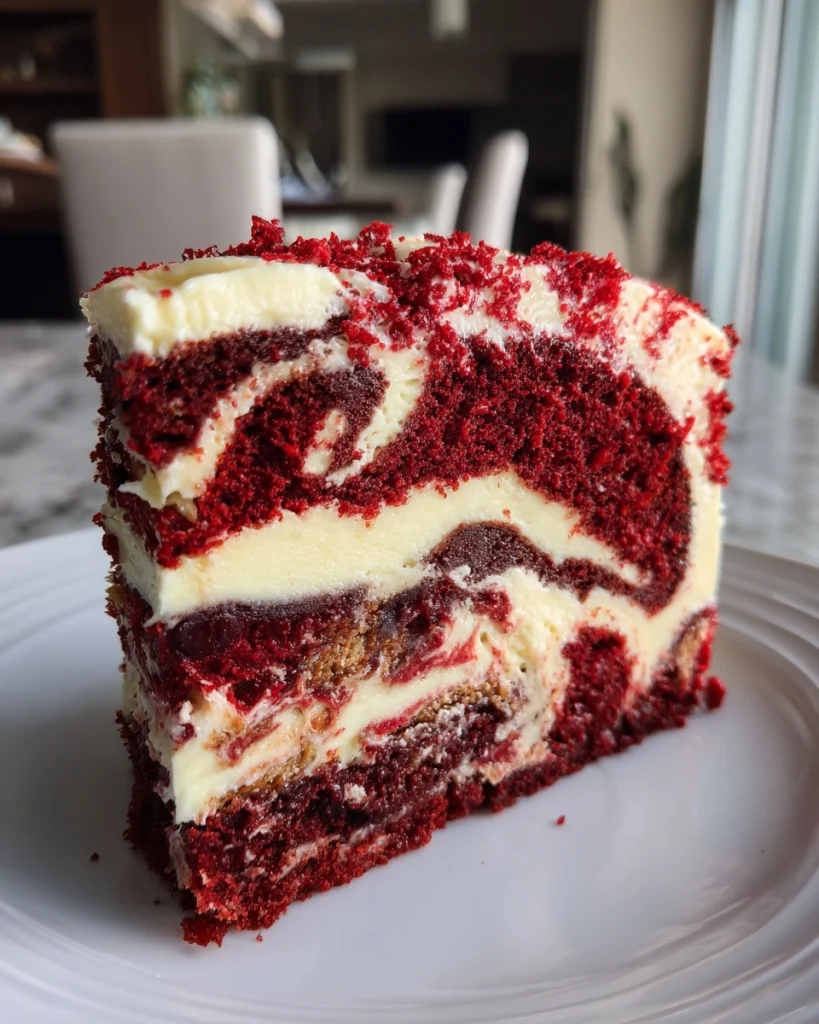
Red Velvet Earthquake Cake with Cream Cheese Lava Swirls
Let me tell you, the Red Velvet Earthquake Cake with Cream Cheese Lava Swirls is a dessert that feels like a warm hug on a busy day. It’s the kind of treat that can turn an ordinary evening into a special occasion. With its rich red velvet flavor and gooey cream cheese filling, this cake is sure to impress your loved ones. Plus, it’s surprisingly easy to whip up, making it a perfect solution for those hectic weeks when you still want to indulge in something sweet. Trust me, you’ll want to keep this recipe close!
Why You’ll Love This Red Velvet Earthquake Cake with Cream Cheese Lava Swirls
This Red Velvet Earthquake Cake with Cream Cheese Lava Swirls is a delightful blend of flavors and textures that will make your taste buds dance. It’s quick to prepare, taking just over an hour from start to finish. The combination of rich red velvet and creamy filling is simply irresistible. Plus, it’s a crowd-pleaser, perfect for family gatherings or a cozy night in. You’ll find yourself making this cake again and again!
Ingredients for Red Velvet Earthquake Cake with Cream Cheese Lava Swirls
Gathering the right ingredients is the first step to creating your Red Velvet Earthquake Cake with Cream Cheese Lava Swirls. Here’s what you’ll need:
- Red velvet cake mix: This is the star of the show, providing that signature color and flavor.
- Water: Helps to hydrate the cake mix, ensuring a moist texture.
- Vegetable oil: Adds richness and keeps the cake tender.
- Large eggs: These bind the ingredients together and add structure to the cake.
- Cream cheese: The creamy filling that creates those delightful lava swirls.
- Powdered sugar: Sweetens the cream cheese mixture, giving it that luscious taste.
- Vanilla extract: A splash of this adds depth and enhances the overall flavor.
- Chocolate chips: These little gems add a burst of chocolatey goodness to each bite.
For those looking to elevate the flavor, consider adding a tablespoon of cocoa powder to the cream cheese mixture for a richer taste. You can find all the exact measurements at the bottom of the article, ready for printing. Happy baking!
How to Make Red Velvet Earthquake Cake with Cream Cheese Lava Swirls
Step 1: Preheat the Oven
First things first, preheat your oven to 350°F (175°C). This step is crucial for ensuring your Red Velvet Earthquake Cake with Cream Cheese Lava Swirls bakes evenly. While the oven warms up, grease a 9×13 inch baking pan. This will help the cake slide out easily once it’s baked.
Step 2: Prepare the Red Velvet Batter
In a large mixing bowl, combine the red velvet cake mix, water, vegetable oil, and eggs. Use a whisk or an electric mixer to blend everything together until smooth. You want to make sure there are no lumps. The batter should be rich and velvety, just like the name suggests! This is where the magic begins, so don’t rush it. Once mixed, set it aside while you prepare the cream cheese filling.
Step 3: Make the Cream Cheese Mixture
In a separate bowl, beat the softened cream cheese until it’s creamy and smooth. Gradually add the powdered sugar and vanilla extract, mixing until well combined. This mixture should be thick yet spreadable, creating that luscious filling that will swirl through your cake. If you want to take it up a notch, consider adding a tablespoon of cocoa powder for a deeper flavor. Trust me, it’s worth it!
Step 4: Layer the Batter and Cream Cheese
Now it’s time to assemble your cake! Pour half of the red velvet batter into the greased baking pan, spreading it evenly. Next, drop spoonfuls of the cream cheese mixture over the batter. Don’t worry about being perfect; the swirls will form as it bakes. Finally, pour the remaining red velvet batter on top, covering the cream cheese layer completely. This layering creates that delightful “earthquake” effect as it bakes!
Step 5: Add Chocolate Chips
Sprinkle chocolate chips generously over the top of the batter. These little morsels add a delightful burst of chocolate flavor that complements the red velvet beautifully. Plus, who doesn’t love a little extra chocolate? It’s like a surprise in every bite!
Step 6: Bake the Cake
Place your cake in the preheated oven and bake for 30-35 minutes. To check for doneness, insert a toothpick into the center. If it comes out clean or with a few moist crumbs, your cake is ready. Keep an eye on it, as ovens can vary!
Step 7: Cool and Serve
Once baked, remove the cake from the oven and let it cool in the pan for about 10-15 minutes. This cooling time helps the cake set. After that, you can slice it into squares and serve. Enjoy it warm for a gooey texture or chilled for a firmer slice. Either way, it’s delicious!
Tips for Success
- Make sure your cream cheese is softened for easy mixing.
- Don’t overmix the red velvet batter; a few lumps are okay.
- For a fun twist, try adding nuts or coconut to the batter.
- Use a toothpick to check for doneness; it should come out clean.
- Store leftovers in an airtight container in the fridge for up to 5 days.
Equipment Needed
- 9×13 inch baking pan: A standard size for this cake; you can use a glass or metal pan.
- Mixing bowls: A large bowl for the batter and a smaller one for the cream cheese mixture.
- Whisk or electric mixer: For blending the batter smoothly; a whisk works just fine!
- Spatula: Great for spreading the batter and cream cheese mixture evenly.
Variations of Red Velvet Earthquake Cake with Cream Cheese Lava Swirls
- Gluten-Free Option: Substitute the red velvet cake mix with a gluten-free cake mix to accommodate dietary needs.
- Nutty Delight: Add chopped walnuts or pecans to the batter for a crunchy texture and nutty flavor.
- Red Velvet Cheesecake: Swirl in a cheesecake mixture instead of cream cheese for a richer dessert experience.
- Spicy Kick: Add a pinch of cayenne pepper or cinnamon to the batter for a surprising twist.
- Fruit Infusion: Incorporate fresh raspberries or strawberries into the batter for a fruity burst.
Serving Suggestions for Red Velvet Earthquake Cake with Cream Cheese Lava Swirls
- Pair with a scoop of vanilla ice cream for a delightful contrast in temperature.
- Serve with fresh berries on the side for a pop of color and freshness.
- Drizzle with chocolate or caramel sauce for an extra indulgent touch.
- Garnish with whipped cream and a sprinkle of cocoa powder for a beautiful presentation.
FAQs about Red Velvet Earthquake Cake with Cream Cheese Lava Swirls
Can I make this cake ahead of time? Absolutely! You can bake the Red Velvet Earthquake Cake with Cream Cheese Lava Swirls a day in advance. Just store it in the refrigerator, and it will taste just as delicious when you serve it.
What can I substitute for cream cheese? If you’re looking for a lighter option, you can use Greek yogurt or mascarpone cheese. Both will give you a creamy texture, but the flavor will vary slightly.
How do I store leftovers? Keep any leftover cake in an airtight container in the fridge. It will stay fresh for up to five days. Just remember to let it come to room temperature before serving for the best taste!
Can I freeze this cake? Yes, you can freeze the Red Velvet Earthquake Cake with Cream Cheese Lava Swirls. Wrap it tightly in plastic wrap and then in aluminum foil. It can be frozen for up to three months. Just thaw it in the fridge overnight before serving.
What’s the best way to serve this cake? I recommend serving it warm for that gooey cream cheese filling. Pair it with a scoop of vanilla ice cream or a dollop of whipped cream for an extra treat!
Summarizing the Joy of Red Velvet Earthquake Cake with Cream Cheese Lava Swirls
There’s something truly magical about the Red Velvet Earthquake Cake with Cream Cheese Lava Swirls. It’s not just a dessert; it’s a celebration of flavors that brings people together. Each slice is a delightful surprise, with the rich red velvet and creamy filling creating a symphony of taste. Whether you’re sharing it at a family gathering or enjoying a quiet moment with a cup of coffee, this cake adds a touch of joy to any occasion. So, roll up your sleeves and dive into this baking adventure; your taste buds will thank you!
PrintRed Velvet Earthquake Cake with Cream Cheese Lava Swirls is a must-try dessert!

Red Velvet Earthquake Cake with Cream Cheese Lava Swirls is a decadent dessert that combines the rich flavors of red velvet cake with a creamy, gooey cream cheese filling, creating a delightful treat for any occasion.
- Prep Time: 20 minutes
- Cook Time: 35 minutes
- Total Time: 55 minutes
- Yield: 12 servings 1x
- Category: Dessert
- Method: Baking
- Cuisine: American
- Diet: Vegetarian
Ingredients
- 1 box red velvet cake mix
- 1 cup water
- 1/2 cup vegetable oil
- 3 large eggs
- 8 oz cream cheese, softened
- 1 cup powdered sugar
- 1 tsp vanilla extract
- 1/2 cup chocolate chips
Instructions
- Preheat the oven to 350°F (175°C) and grease a 9×13 inch baking pan.
- In a large bowl, combine the red velvet cake mix, water, vegetable oil, and eggs. Mix until well combined.
- In a separate bowl, beat the softened cream cheese, powdered sugar, and vanilla extract until smooth.
- Pour half of the red velvet batter into the prepared baking pan.
- Drop spoonfuls of the cream cheese mixture over the batter, then pour the remaining red velvet batter on top.
- Sprinkle chocolate chips on top of the batter.
- Bake for 30-35 minutes or until a toothpick inserted in the center comes out clean.
- Allow to cool before serving.
Notes
- For a richer flavor, add a tablespoon of cocoa powder to the cream cheese mixture.
- Serve warm for a gooey texture or chilled for a firmer slice.
- This cake can be stored in the refrigerator for up to 5 days.
Nutrition
- Serving Size: 1 slice
- Calories: 350
- Sugar: 25g
- Sodium: 300mg
- Fat: 18g
- Saturated Fat: 8g
- Unsaturated Fat: 8g
- Trans Fat: 0g
- Carbohydrates: 40g
- Fiber: 1g
- Protein: 4g
- Cholesterol: 50mg